
Pumpkin Spice Oat Muffins
/
Victoria BC Dietitian (Nutritionist) Kristen Yarker, MSc, RD Shares a Recipe for Delicious and Healthy Pumpkin Spice Oat Muffins. A Healthy Hidden Veggie Snack for Picky Kids (and Adults Too)
Read MoreYou can unsubscribe at any time.
Kristen Yarker, 23083 Cook St PO, Victoria BC V8V4Z8
250-532-0609 . kristenyarker.com . Disclaimer
Victoria BC Dietitian (Nutritionist) Kristen Yarker, MSc, RD Shares a Recipe for Delicious and Healthy Pumpkin Spice Oat Muffins. A Healthy Hidden Veggie Snack for Picky Kids (and Adults Too)
Read More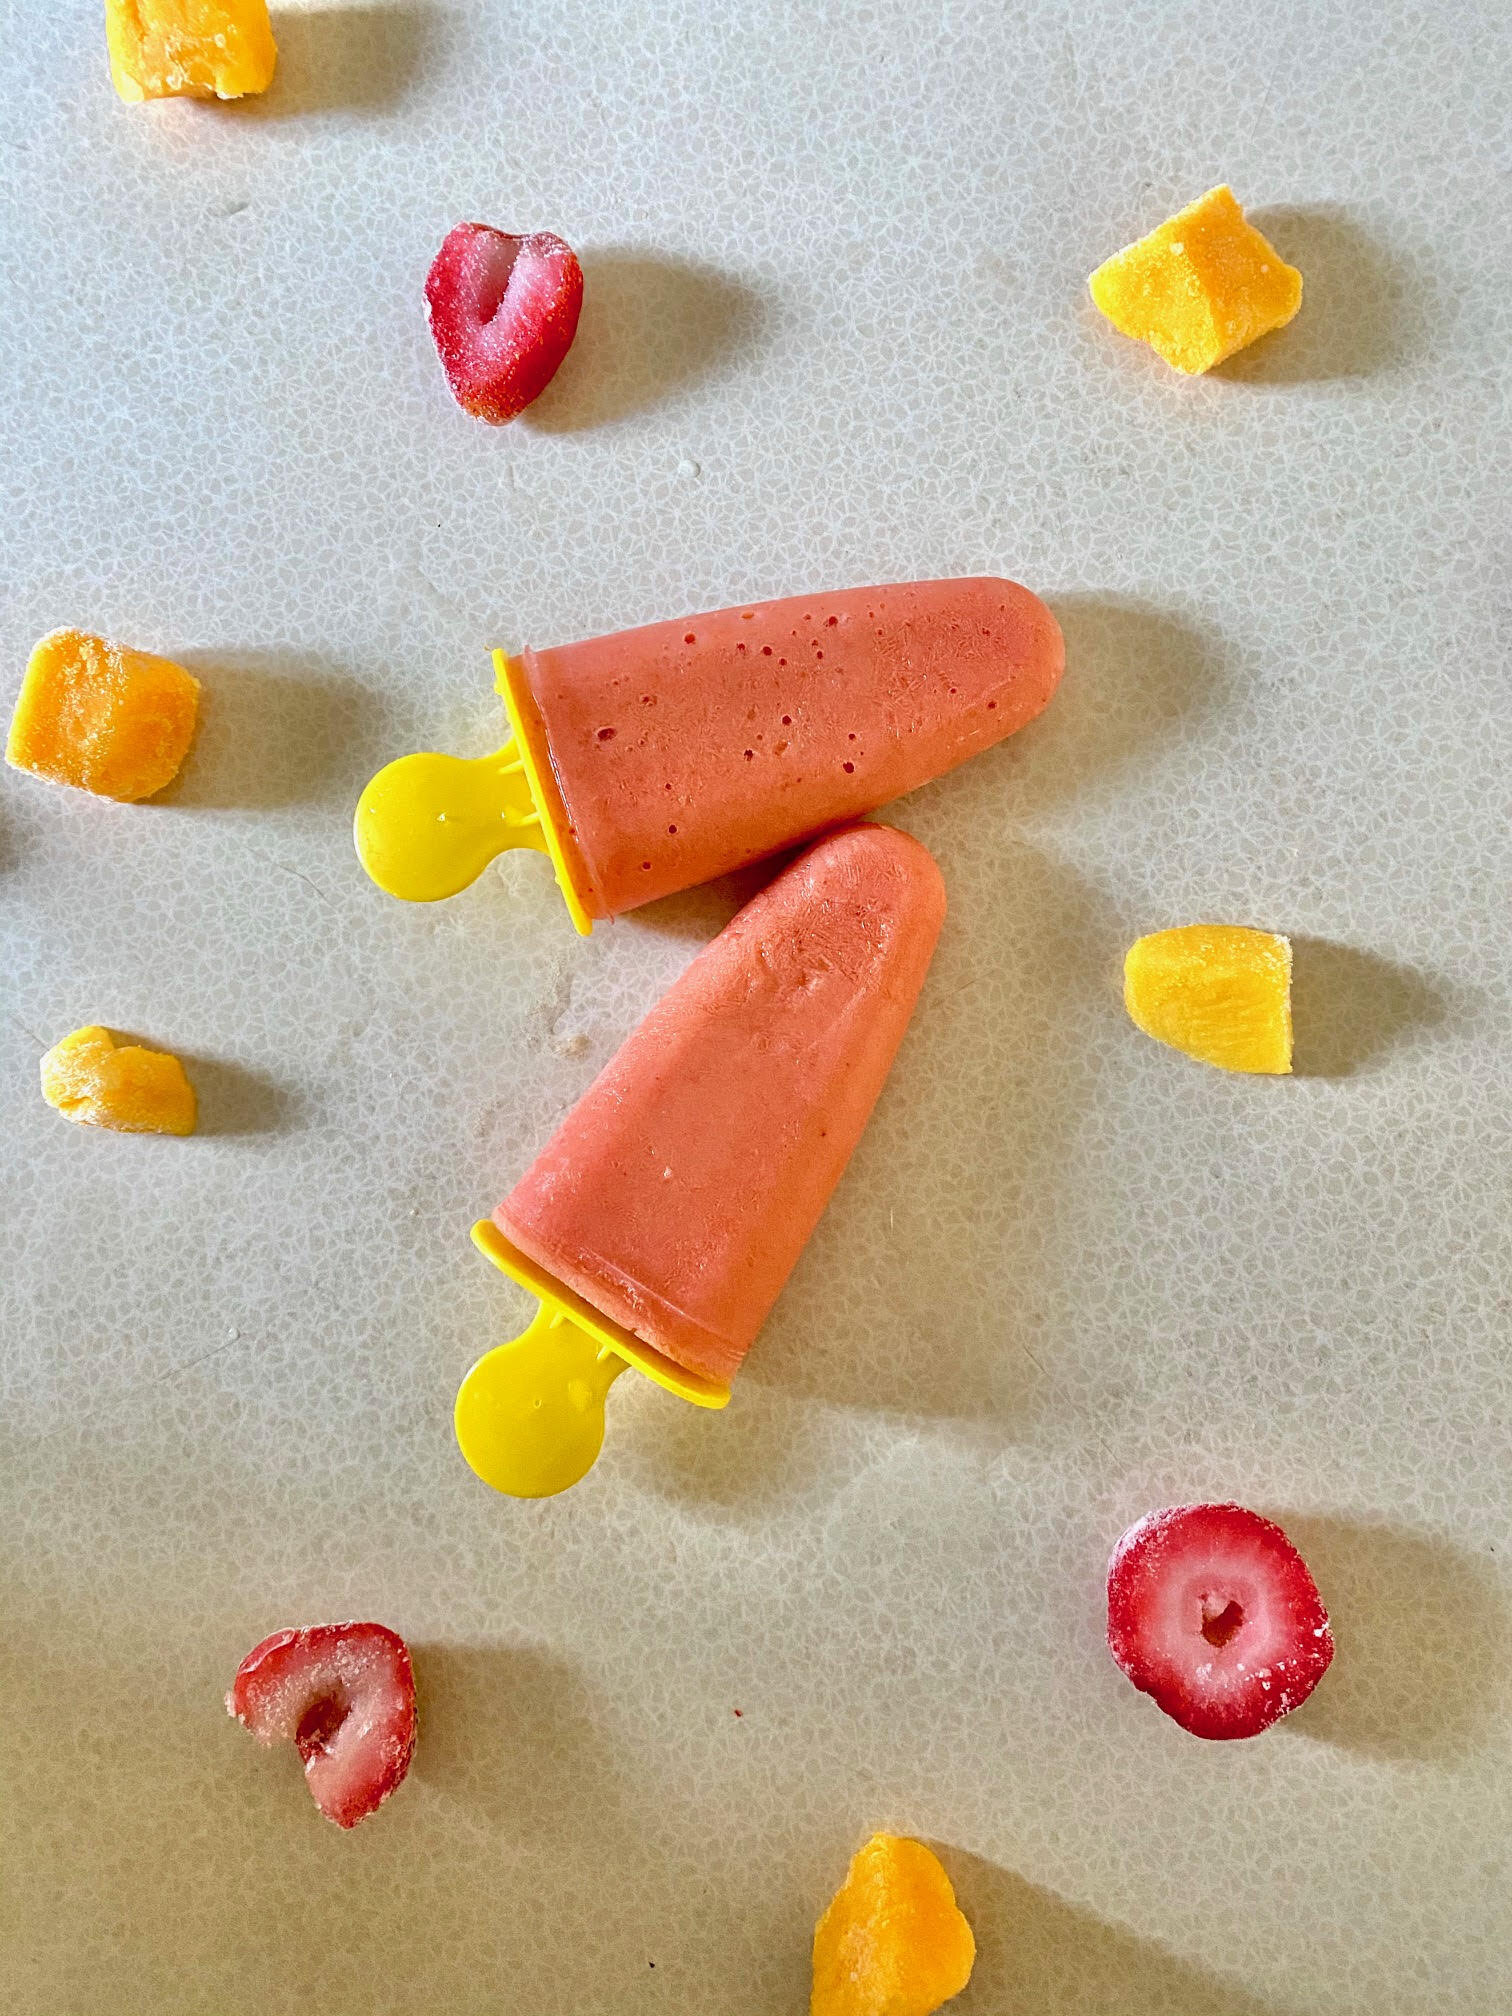
Call them ice pops, popsicles, or paletas, these are a delicious, cool way to eat your veggies and fruits. And, they’re perfect for picky kiddos who don’t like to eat their veggies.
Makes 6 popsicles (will vary with size of moulds)
2 carrots, chopped
1 1/2 cup strawberries, fresh or frozen
1 cup mango, fresh or frozen
1/2 cup water
Peel and chop carrots. Put carrots into boiling water for 5 minutes, until fork tender.
Remove carrots from water and set aside.
Combine ingredients in a blender. Blend until smooth.
Pour mixture into popsicle moulds. Freeze until solidified.
Enjoy!
Get more home-made ice pops (with hidden veggies) HERE.

Love this post?
Pin it!
Save this post for later or share it with your friends and family on Pinterest.
Check out more of Kristen’s pins here.
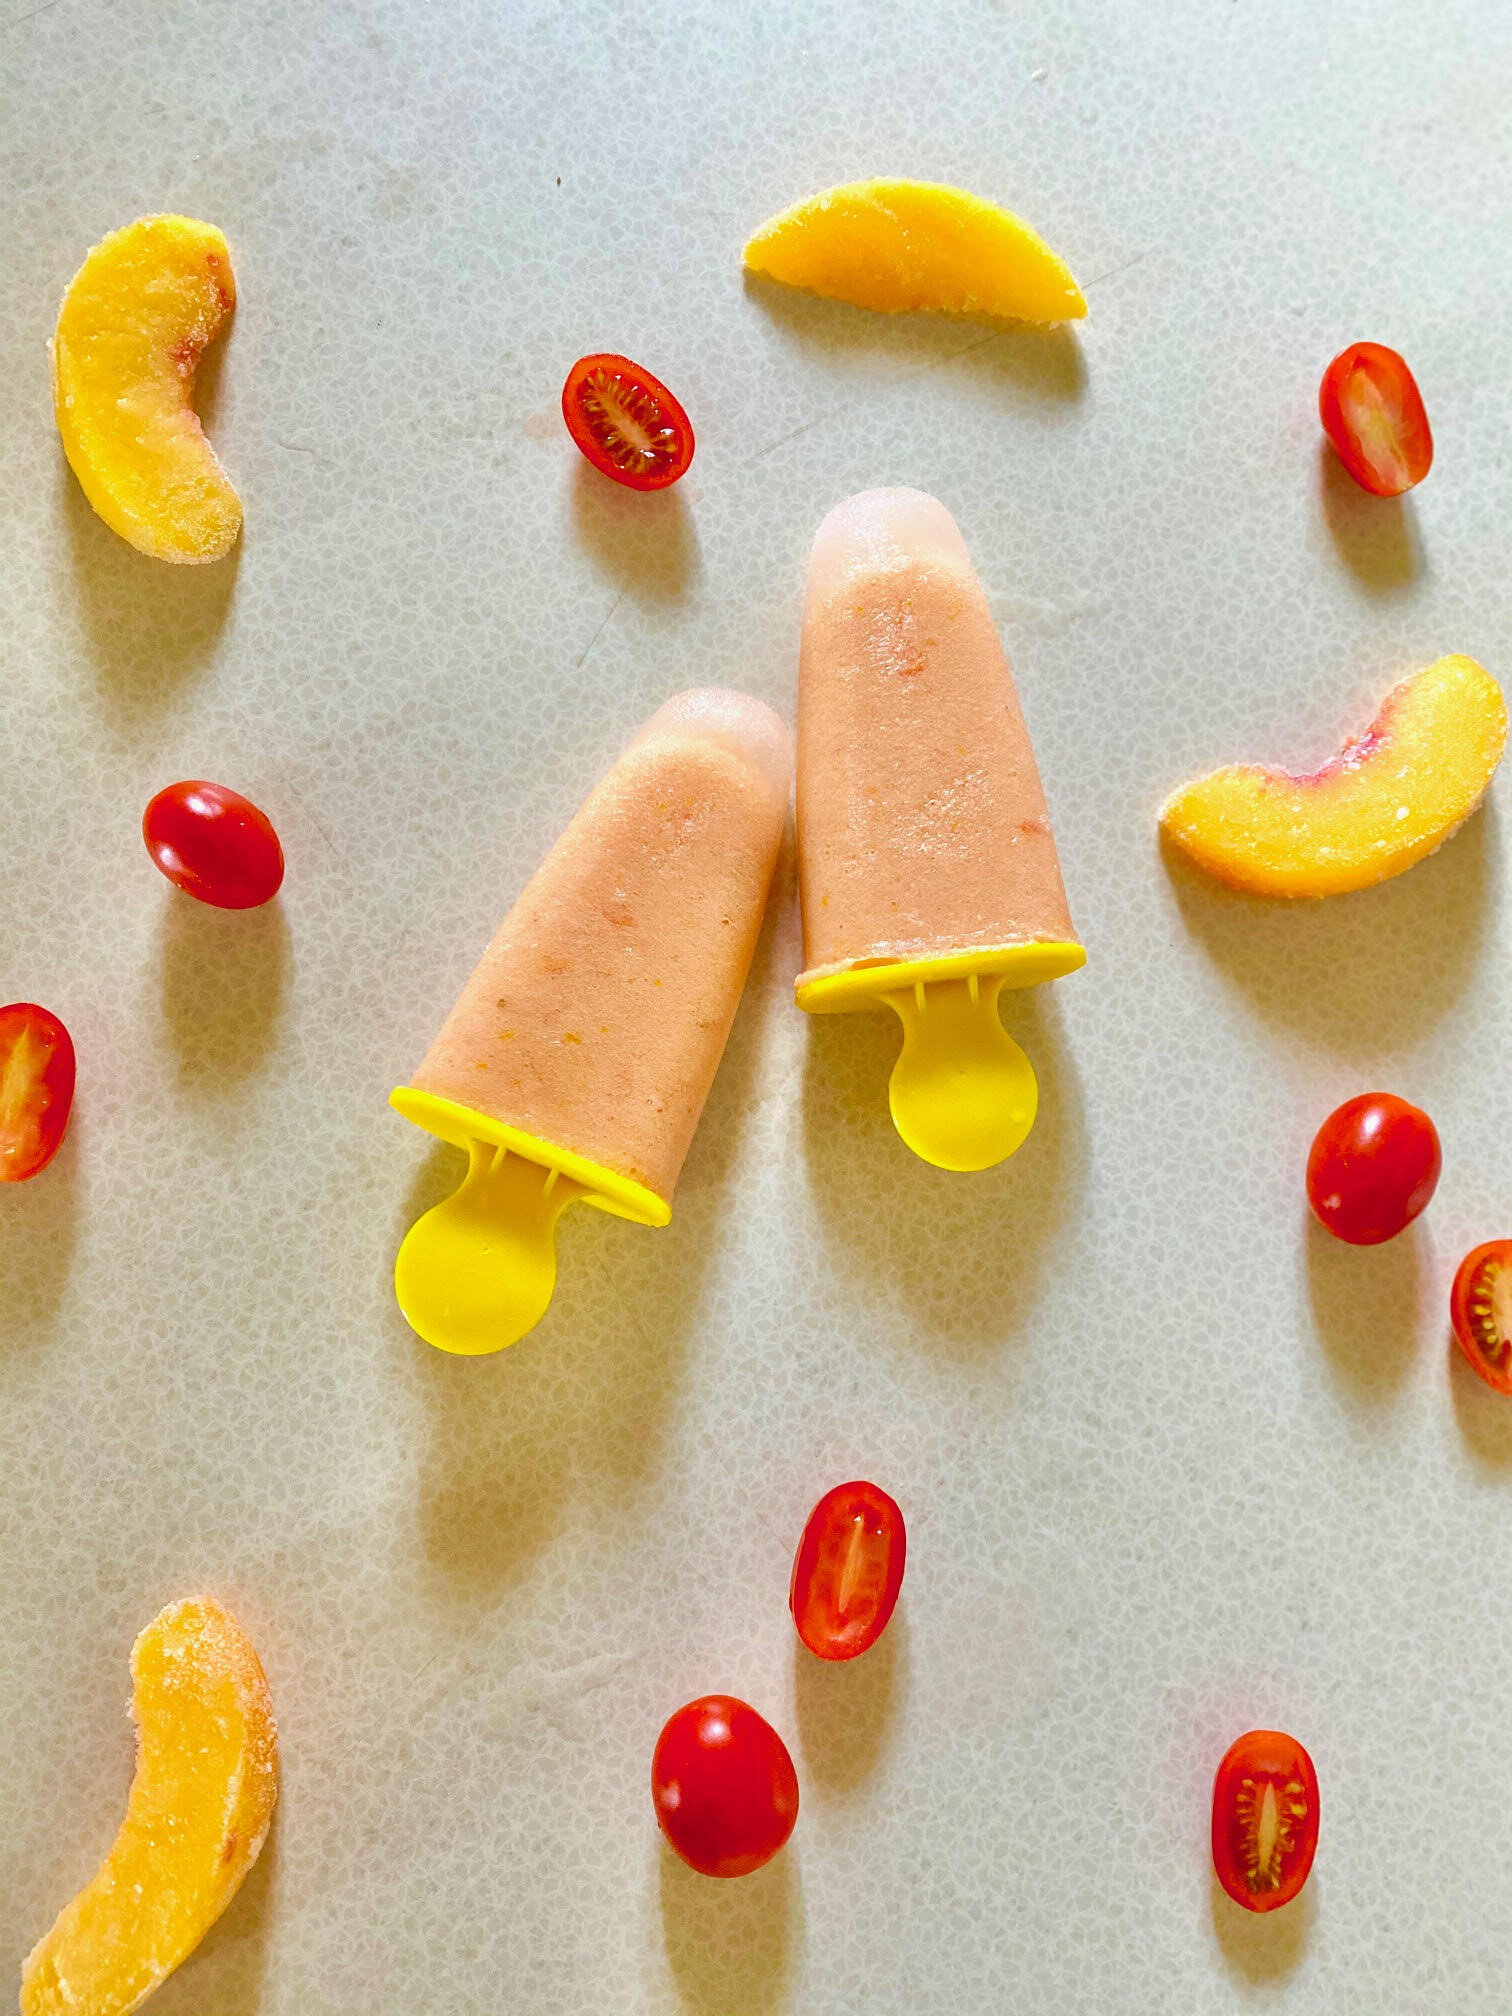
PEACHES AND CREAM POPSICLES
Makes 6 Popsicles (will vary with size of moulds)
INGREDIENTS:
8 cherry tomatoes, orange or red
2 cups peaches, fresh or frozen
2 tbsp honey (or maple syrup or agave syrup) *optional
1/4 cup coconut milk
1/2 cup water
DIRECTIONS:
Combine all ingredients in a blender. Blend until smooth.
Pour mixture into popsicle moulds. Freeze until solidified.
Enjoy!
Recipe and photo by the amazing dietetics student Alyssa Chai. Thank you Alyssa!

Love this post?
Pin it!
Save this post for later or share it with your friends and family on Pinterest.
Check out more of Kristen’s pins here.
Child-Feeding Expert and Victoria BC Dietitian (Nutritionist) Kristen Yarker, MSc, RD Shares a Delicious Recipe for No-Sugar Tropical Kale Ice-Pops (Popsicles).
Read MoreChild-Feeding Expert and Victoria BC Dietitian (Nutritionist) Kristen Yarker, MSc, RD Answers the Question At What Age Pickiness Usually Disappears. What Age Kids Outgrow Picky Eating.
Read MoreChild-Feeding Expert and Victoria BC Dietitian (Dietician Nutritionist) Kristen Yarker, MSc, RD Shares Delicious Recipes for Healthy, No-Sugar-Added, Homemade Ice Pops (Popsicles / Paletas)
Read More
Love the flavour of pumpkin spice and pumpkin pie? But looking for a healthy way to enjoy it? Look no further. This mousse is seriously delicious.
I admit that I'm lazy so I make it without the crust. And it's still fantastic! I find that the pumpkin mousse tastes best when refrigerated overnight.
This recipe is a great way to include some more veggies (for picky kids and us adults who can use to eat more veggies too). Pumpkin rocks the vitamin A and has good fibre too.
Baby Food Version: Make this recipe without the crust and omit the maple syrup.
1 cup of full fat coconut milk (put in fridge overnight)
1 can (398mL / 14fl oz) pumpkin puree
1/4 cup of black chia seeds
1/4 cup maple syrup
1/2 tsp vanilla extract
1/2 tsp cinnamon
1/2 tsp nutmeg
“Bottom crust”
3 dates
1 cup of raw nuts (e.g. walnuts and pecans)
1/4 cup of oats
1/2 tsp cinnamon
1/2 tsp nutmeg
In a food processor, mixer or blender, add all the ingredients. Start with low speed and work your way up to high speed.
Once all the coconut chunks are pureed set aside in a bowl.
For the “crust”, mix together dates, raw nuts, cinnamon, oats, and nutmeg in a food processor until the dates have broken down.
Take a spoonful of the “crust” into a parfait cup and add the pumpkin mousse.
Enjoy!
Get more recipes on my recipe page HERE.
Photo and recipe credit: Amazing student Hanna Kim (Thanks Hanna!)

Love this post?
Pin it!
Save this post for later or share it with your friends and family on Pinterest.
Check out more of Kristen’s pins here.

You asked for a healthier alternative to the famous (and delicious) chocolate hazelnut spread (you know which one). Today I'm sharing not just one, but 4 alternatives. All are much lower in sugar and have no palm oil. Just in time for back-to-school. I mention back-to-school because you'll not only be looking for packed lunch ideas, but also breakfast ideas for rushed mornings and quick after school snack ideas.
All of these contain nuts or seeds. That's the foundation of this foodstuff afterall. Some preschools and schools are nut and seed-free, some are nut-free (i.e. seeds are okay), and some are peanut-free (i.e. nuts and seeds are okay). Always check with your individual facility to find out exactly what is and what isn't allowed.
An important note, especially if you are introducing these to picky eaters who already are familiar with the famous chocolate hazelnut spread, none of these taste exactly the same. So, don't try to pull a fast one on your little one and swap one for the other. They'll notice the difference - kids have keen observation skills with their food. Call this spread by a different name. This way they will be expecting something different.
A huge THANK YOU to student volunteer Carla for her help with these recipes!
Enjoy!

Ingredients:
Directions:
Ingredients:
Directions:

Habibi's Chocolate Tahini and Powerplant's Chocolate Sprouted Seed Spread
(Note: In the spirit of being fully transparent, both of these were given to me for free. I did not receive payment to review either. I'm super picky about what foods I'll share with you in my reviews.)
I brought both of these to my co-working space last week so that everyone could try them. Yes, there are perks to having dietitians as friends and co-workers! Both received very positive reviews. Some people preferred one and an equal number preferred the other. Both products have a short ingredient list with only recognizable foods. They're made with nuts or seeds, providing healthy fats (and no palm oil). Each has just a touch of sugar/sweetener. Check each product's websites for a listing of what stores you can find them in.
Powerplant's spread has an intense chocolate taste for you dark chocolate lovers. It has a chunkier texture but smooth mouthfeel. So it's perfect for spreading on a cracker but not on soft bread. It totally screams to be included in your next smoothie.
Habibi's Chocolate Tahini has a milder chocolate taste. A few people found the tahini and chocolate flavours fought eath other. Most of us thought it was delicious (me included). This spread is the more classically kid-friendly of the two.
Looking for more healthy, kid-friendly recipes? Check out my recipe page.

It's back, my annual home-made ice pop recipe collection. Some may call these homemade popsicles or paletas. Or, frozen smoothies. Whatever you call them they're a delicious summer treat. I want to give a big shout out to Carla, the dietetic student who is volunteering with me for creating these recipes. My directions for her: the recipes need to be simple, include no added sugar, include fruit and even veggies, and only include easy-to-find ingredients. Oh, and of course, that they needed to be delicious. She sure delivered.
The directions for each recipe are the same:
Enjoy her work!
Kristen
P.S. For more delicious, healthy frozen recipes, check out these links:
Spinach Kiwi
Inspired by: http://www.kiipfit.com/spinach-kiwi-popsicles/
Packed with fruit and leafy greens, the vibrant green color of these popsicles comes from blending both kiwi and spinach.
Mango Lassi

Inspired by: http://revisfoodography.com/2015/04/mango-lassi/
Inspired from a classic Indian cold drink, mango lassi is a blend of yogurt, fruit and spice. Not a fan of cardamom? Simply omit the spice and you can still enjoy it as a mango-yogurt blend.
Cantaloupe

This very simple and refreshing recipe allows you to use ripe or extra ripe cantaloupes. No added sugar necessary.
Get more healthy home-made ice pop recipes here:

Sometimes the classics are a classic for a reason. Bananas and peanut butter simply taste great together. Here's a fun way to bring this classic duo together in a healthy kids snack. I'm choosing to share it today because it's easy for young hands to manage. Perfect if you're gearing up to pack snacks or a lunch for little ones with back-to-school next week. This works well with peanut butter, other nut butters (e.g. almond butter) and the non-nut butters if your child attends a nut-free facility.
Hey, it's also a delicious idea for those of us who are young at heart :)
Banana Roll-Ups Ingredients 2 small tortilla wraps, whole wheat ¾ medium banana 1 tbsp natural peanut butter, nut butter or non-nut butter ½ tsp honey (optional) 1 dash cinnamon, ground
Banana Roll-Ups Directions
Get more healthy, simple, kid-friendly recipes.

I wish that I had discovered this recipe earlier in my life. It’s creamy, smooth and delicious – just like ice cream! Banana ice cream.
While it’s vegan and sugar-free, the best thing about this recipe (besides the taste) is that it only includes 1 or 2 ingredients. How great is that!
The secret is very ripe bananas. Buy them when you see them in the store. Slice and freeze them. Then you’re ready to make ice cream anytime you wish.
Blending the bananas does take a little while. At first they will break into a chunky slurry and you will likely think that this “ice cream” idea doesn’t work. Be patient. Next it will form one big ball. Then, suddenly, it will become a beautiful, smooth, whipped texture – just like ice cream. If you haven’t added any strongly coloured flavourings, the colour of your bananas will also suddenly lighten considerably to a creamy off-white. That’s what you’re looking for – your “ice cream” is ready!
There are likely hundreds of flavor combinations. I’m sharing the plain version (so you know the base recipe) along with 3 flavour ideas. My favourite is the cinnamon.
Plain
1 cup sliced bananas
Cinnamon
1 cup sliced bananas
¼ tsp cinnamon
Chocolate
1 cup sliced bananas
½ - 1 tsp cocoa
Half a teaspoon of cocoa results in a banana ice cream with just a hint of chocolate. One teaspoon gives a full chocolate flavour. Choose a level that you enjoy.
Strawberry
2/3 cup sliced bananas
1/3 cup strawberries
This combination works best if you partially blend the bananas first until they are just about to start creaming. Then add the strawberries. The result will be a creamy ice cream with strawberry flavour. Adding the strawberries at the same time as the bananas results in a more icy rather than creamy texture (more sorbet-like rather than ice cream-like).
Check out more healthy recipes.
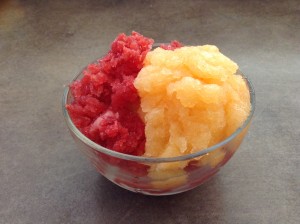
Similar to a slushie but made with real fruit, granitas are super refreshing in the summer heat.
They’re easy to prepare. The only tricky thing is to plan ahead so that you’re home and you remember to break up the ice crystals every hour (I set the alarm on my phone to remind me).
Kids can help measure ingredients, push the buttons on the blender, and scrape the ice crystals.
The fruit flavor is strong in granitas. The recipes here are listed from the most mild to the strongest. If your little ones prefer mild flavours, stick to the melon granitas. The kiwi granita is so strong that it almost made my eyes water (which I enjoyed on a hot afternoon).
The steps are the same for all the recipes:
Cantaloupe
Adapted from: http://www.whiskaffair.com/2013/03/cantaloupe-lemon-and-mint-granita.html
1 cantaloupe
1/4 cup sugar
¼ cup water
4 TBSP fresh lemon juice
Raspberry-Watermelon
Adapted from: http://whipperberry.com/2013/06/raspberry-watermelon-granita.html
5 cups cubed, de-seeded watermelon
2.5 cups raspberries
½ cup sugar
½ cup cran-raspberry juice cocktail
(Combine sugar and cran-raspberry juice cocktail in saucepan.)
Pineapple-Mango
Adapted from: http://www.muybuenocookbook.com/2013/03/pineapple-and-mango-granita-blendtec-giveaway/
Juice from 2 limes
1/3 cup sugar
1 pineapple, peeled, cored and diced
2 mangos, peeled, pitted, and diced
(There’s no heating the sugar in this recipe. Simply combine all ingredients in a blender.)
Kiwi
Adapted from: http://dhaleb.com/2010/03/
5 kiwis
½ cup sugar
½ cup water
1 cup club soda
2 teaspoons lime juice
See more delicious, healthy recipes here.

Have you taken the healthy step of including nuts in your daily eating habits? Perhaps you’re eating nuts because of their healthy fats. Or, because you’re eating a more clean, plant-based diet. Or, because they make a great protein-rich snack that doesn’t need to be refrigerated. Whatever your reason, nuts certainly are a healthy food to include regularly. When I work with clients, I look to have them eat nuts and seeds frequently. The good news is that word about how healthy nuts are seems to be getting out to people. Most clients I see are eating nuts several times a week. However for a large number of clients, eating nuts equals almonds. Only almonds. It may be whole almonds, almond butter and/or almond milk, but the only nut or seed that they’re eating is almonds. This is a problem.
If almonds are the only nuts that you eat, now’s the time to expand your repertoire to include different nuts and seeds. Here’s why:
Variety is Better Than Any 1 Food: We humans are omnivores. Your body is designed to eat a wide variety of foods. Yet, so many people eat the same few foods over and over again. Nuts and seeds are all different. Some have more healthy fats, some have more protein, and they vary in the amount of minerals and other nutrients. By sticking to only one or two nuts/seeds you are missing out on many of the benefits of different nuts/ seeds. And, when you eat a lot of only a few foods, you can get too much of some nutrients.
California Drought: Most of our almonds come from California. Did you know that California has been experiencing a drought for years? And, that their ground water is decreasing fast. Did you also know that almonds trees take a large amount of water? It’s not a good combination.
Before you throw the baby out with the bathwater (I hate that saying, do you know of a less violent one that expresses the same meaning?), please note that I’m not saying to never eat almonds again. What I’m saying is that considering that eating a variety of foods is a healthier choice, now’s a good time to take the pressure off of California water sources by expanding your nut and seed repertoire. Enjoy almonds amongst a wide variety of nuts and seeds.
There’s a whole world of nuts and seeds out there. Explore it. I do - half a shelf of my fridge is taken up with nuts and seeds. And yes, you want to store them in the fridge to keep them from going rancid.
Here’s some ideas of nut and seeds to check out. Alternatively a trip to your local bulk food section can inspire you.
Curious about how I can help you achieve your health and nutrition goals? Schedule a (free) call to find out.

I'm a true kid of the 1980's Canadian suburbs. Growing up, we went to McDonalds a couple of times a year. One of those times each year, guarenteed, was in March. Why? If you grew up similar to me, you already know the answer...Shamrock Shakes. I totally LOVED those green, mint milkshakes that McDonalds only had on the menu around St. Patrick's Day.
To be honest, I had totally forgotten about those shakes. Those childhood days are long gone. But last Spring, while on a surf trip in California, I had a smoothie that brought it all back. It was pistachio and mint, and it was DELICIOUS! Ever since then I can't get mint or pistachios off my mind. So, of course I had to create recipes for a healthy, minty green smoothie in time for St. Patrick's Day.
I didn't remember exactly what was in that smoothie in California. So I bought all sorts of green ingredients. And, I created a second green smoothie. Why not?!
The directions are easy. Simply combine all ingredients in a blender and blend until smooth. Adjust the amounts to suite your tastebuds. Too thick? Add more liquids. Too thin? Add more solids.
The two recipes are:
1 tablespoon flax seeds
3 tablespoons pistachios
3/4 cup milk (or plant-based alternative)
1/3 cup plain yogurt
1 cup (packed) baby spinach
3 chopped dates
2 tablespoons (packed) fresh mint
1 teaspoon honey
1 tablespoon flax seeds
1/4 ripe avocado
1/2 banana
2 large kale leaves, centre ribs removed
3 tablespoons pistachios
1 cup milk (or plant-based alternative)

I had the best time on Friday! I was invited to the Valentine’s Day party at the local elementary school. I brought a variety of fruits and veggies and led an activity where we used cookie cutters to cut out hearts and thread them onto wooden skewers to make cupid’s arrows (thank you Pinterest). Do I have the best job or what?! But was I just playing? No. There’s a method to my madness. I’ve learned something in the (gulp) 20 years that nutrition’s been my world. It’s that teaching nutrition to kids isn’t the way to inspire people to have healthy eating habits. Sure, talking about vitamins, minerals, etc will change what some people eat. There will be the exception that proves the rule. But it truly is the exception. I learned this lesson the hard way. When I was a bubbly, enthusiastic nutrition student, I shared my new-found knowledge with anyone and everyone (whether they asked for my 2 cents worth or not). Guess what? Not surprisingly, most people rolled their eyes at me and went on with their same (unhealthy eating) behavior.
I’ve learned that the most effective way to influence people’s behaviour is to simply serve them delicious, healthy food. And don’t say anything about it.
With kids there is even more opportunity! You see they haven’t had 10, 20, 30 years-of habits that we need to break. With kids, all we need to do is to include healthy foods in fun and everyday activities. To make healthy eating the norm. That’s why I worked to get myself invited to the Valentine’s Day party. Because, it was a fantastic way to infuse a celebration day with healthy food. The kids totally got into it and had a fantastic time. In fact, we hardly had enough fruit to thread on the skewers because they were eating so much of it. I can honestly tell you that they didn’t miss baking cookies one bit.
Creating a positive association with healthy eating is more powerful than knowing that I “should” eat something because it has vitamin so-and-so in it.
Recently a study confirmed my experience. They found that kids were less likely to try a food. And, they rated a food as tasting worse, if they were told that it was healthy.
It’s so tempting to go on and on about WHY kids should eat a healthy food. But do your best to resist the temptation. It’s more effective if you aren’t heavy-handed with the “nutrition” talk.
As the saying goes:
“Actions speak louder than words”.
How do you incorporate healthy eating into fun activities? I'd love you to share in the comments below!
Get my e-newsletter for successful tips to teach kids healthy eating.

Here’s what a Mom recently asked me: "I have what may be a silly question. Should I be concerned with my 8 month old getting too much fruit? In other words, can kids have too much fruit?
In a word: yes. Let me expand with 2 key points.
In particular, for babies, toddlers and preschoolers, iron is a key nutrient that we’re looking to provide through food. Fruit is low in iron. It’s recommended that you offer iron-rich foods twice a day.
It’s normal for kids to have food preferences. However, kids aren’t at a developmentally ready to understand that human beings can’t survive on a favourite food alone until they’re well into their school-age years.
If you notice that your child will always choose one or two favourite foods, I recommend starting a technique that I call “controlling what’s on the menu”.
Here’s how. You choose what foods you will offer, i.e. what foods are on the menu, at meals and snacks. Your child gets to choose what they’ll eat from what you’ve provided. And, they get to control how much of each food they eat (yes, including zero bites).
This way you are creating a situation where your child eats a balance of food groups throughout the day. And, your child gets to express themselves by controlling what they eat from what you’ve provided. You’ve created an environment where you’re making sure that your child is getting good nutrition at the same time as your child’s personal boundary with their body is respected.
For example, for this mom’s 8 month old, at one solid food time each day serve an iron-rich food either on it’s own, or with another food that isn’t fruit – maybe it’s a vegetable or a grain. Feel free to offer fruit at the other solid food time where you’re offering the iron-rich food. If your child eats a particularly huge amount of fruit one day and you notice that his stools are loose, hold off offering fruit for a day or two. Create balance by offering vegetables, protein foods, and grains.
Get child nutrition tips delivered directly to your inbox. Sign-up for my e-newsletter.

When I’m introducing my concept of 5-6 equal opportunities to eat to Moms and Dads many think that it sounds impossible – it’s too much work. But I promise you it’s not. In fact, it’s likely the same amount of work that you’re currently doing. But it’s work that’s moving you in the right direction of getting your picky eater to try new foods (instead of inadvertently fuelling pickier eating).
But I think I’m getting ahead of myself here. First let me explain what I mean by 5-6 equal opportunities to eat.
Toddlers and preschoolers have little tummies, short attention spans, and big nutrition needs. That’s why they need more than just 3 meals a day. I’ve found that most kids so best with three meals plus two or three snacks per day.
When I say the word “meal”, you likely imagine something with healthy foods from multiple food groups, perhaps eaten while sitting at a table. In contrast, when I say the word “snack” you likely think of something small to eat, perhaps less healthy foods, grabbed and eaten on the run.
Most toddlers and preschoolers don’t have appetites that are bigger at “meal” times and smaller at “snack” times. Instead of differentiating between “meals” and “snacks”, I recommend treating these as all as “opportunities to eat”.
So, instead of giving your child 3 meals plus 2 – 3 snacks per day, I recommend re-framing the concept to offering 5 – 6 opportunities to eat each day.
But the phrase that I started with in this post had the word “equal” in it: “5 – 6 equal opportunities to eat” .
Here’s where the “equal” comes into play.
To best meet kids’ nutrition needs in the face of their short attention spans, I recommend taking each of the 5 – 6 opportunities to eat to provide kids with healthy foods. This way if they eat a lot at afternoon snack and only two bites at dinner, it’s less of a worry than if you gave your child junky foods at afternoon snack and were relying on dinner for those vegetables, fruit, and whole grains.
Consider each opportunity to eat an equal opportunity to provide healthy foods from 2 – 4 food groups. Yes, this may mean that you’re putting more thought and effort onto your child’s snacks.
However, I can’t tell you how many families I’ve worked with who are providing quick snack handouts all day long. These parents are feeding their kids almost every hour of the day. That’s a lot of work!!
Instead of putting all your time and effort into providing constant snacks, I recommend offering 5 – 6 equal opportunities to eat each day, each of which has 2 – 4 food groups.
It’s less work than you think. And, you will be more successful in helping your child get the nutrition they need and have less picky eating behaviour.
Have you been using the 5 – 6 equal opportunities to eat strategy? Have you found it to be more work? I’d love you to share your experience in the comment section below!
Get more successful picky eater tips delivered directly to your inbox when you sign up for my e-newsletter.

{Guest Expert Contribution to Kidzedge} If you’re like the parents of picky eaters I’ve helped for the last 6 years, you’re constantly on the look out for ways to get your kids to eat more (healthy) foods. After school snacks are a great (and often overlooked) opportunity to contribute to kids’ nutrition. Here’s why after school snacks are such a great time to get kids to eat more foods, how to do it, and some snack ideas.
Have you ever tried getting a child to eat a new food when they aren’t hungry? It’s a lesson in futility. Many kids have big appetites at after school snack time. Appetite is a great motivator for kids to try new foods. Take advantage of this natural window of opportunity and use after school snacks to offer your child new foods.
Step #1: Plan snacks that include foods from 2 or more food groups. Often we think of snacks as a time for junk food. Or, as a time for a single food – e.g. an apple. But kids have big nutrient needs and small tummies. They need healthy foods more than just at 3 meals per day.
Step #2: Consider meals and snacks to be equal opportunities to eat. A mistake that many parents make is to give their child healthy foods at meals and favorite foods at snacks. This stacks the odds against kids eating well at meals. Instead, frequently, give your child a snack that includes either a new food or a food that your child has seen many times but hasn’t tried yet.
Step #3: Think outside the snack aisle. When looking for snack ideas, it seems natural to look in the snack aisle of the grocery store. But this aisle is mostly filled with highly processed, junk foods. Instead, look for easy to eat versions of meal foods. Focus on providing foods from the food groups where your child isn’t meeting the recommendations. To see the recommendations, check out My Plate or Canada’s Food Guide
White Bean Dip Recipe
Makes 12 Servings
1 can (14 oz, 17.6 oz) cannellini beans, canned, drained 1 bulb garlic, raw 1/4 cup (2 oz) olive oil 1/4 cup (2 fl oz) lemon juice, fresh
Directions:
Note: You can roast the garlic days in advance.
Check out my recipe page for more healthy after school snack ideas for kids.

Recently my friends and I were having a nostalgic laugh about the rising trend of home-made ice pops – also known as paletas. The dietitian in me loves that parents are choosing to make tasty snacks for their kids that beat the heat that include real fruits (even veggies) instead of frozen, colored, sugar water. What made my friends and I giggle was remembering how we too had homemade ice pops when we were kids. However, we were raised in the suburbs in the early 80’s. Our ice pops consisted of frozen OJ concentrate, re-constituted with water, and then frozen again in the ice-pop molds. Not exactly gourmet!
Now pint-sized foodies are enjoying paletas (even the new name is fancy) made with on-trend, healthy ingredients like coconut, avocado, Greek yogurt, almond milk, even kale. And, while we were absorbing all sorts of plastic by-products, you can now buy BPA-free plastic molds and stainless steel molds. It’s amazing how far we’ve come!
Interested in making some yourself? A Google or Pinterest browse will supply you with a summer full of healthy frozen kids snack ideas. Here are two ideas to get you started. For the recipes, all the steps are the same:
You really need to blend this recipe well, otherwise the kale pieces are quite big which I found unpleasant (and I love kale). The kale is never truly hidden in these, but when well-blended, it’s an enjoyable part of their texture.
1 cup frozen blueberries 1 cup kale leaves, stems removed (ideally baby kale leaves) 2 cups coconut water
A luscious, dairy-free recipe!
1.5 cups almond milk 1/2 cup coconut milk 1 cup fresh or frozen raspberries 2 teaspoons honey pinch of salt
Combine your favorite fruits with other healthy ingredients for a delicious and refreshing summertime paleta treat!
Get more home-made ice pop recipes here.
 It happened again yesterday. I was leading a workshop and a parent asked me: “Is it wrong to give my child smoothies with veggies in them? Is this considered hiding veggies?” Rarely a workshop goes by without a parent asking me about smoothies for their picky eater kids. They’re such a popular trend these days. While I touched on this in last week’s blog post; it’s such a common question that I get about healthy snacks for kids that I thought that it was worthwhile to expand on it today. And, share some ideas for smoothie ingredients.
I think that smoothies are a great way to provide vegetables, fruit, protein, and healthy fats for kids. BUT there are a couple of key points to follow to be using them to role model healthy eating and support your child to try new foods on their own:
As I mentioned above, smoothies are a great way to provide vegetables, fruit, protein and healthy fats in a way that many picky eaters will actually eat. Here are some ingredient ideas. Note that some of the ingredients (e.g. nuts) require a higher-powered blender. Mix and match the ingredients to find combinations that you love. And don’t’ be afraid to experiment to find new favs. My new favourite is pistachio-mint-banana, which I was introduced to while on vacation in California last month!
Other tasty ingredients (that pack more of a taste punch than a nutritional punch):
Looking for more ideas? Check out the recipe for my Sunshine Smoothie (Orange-Pineapple-Fresh Turmeric) or these green smoothies.

Copyright (c) 2008 - 2026 Kristen Yarker Nutrition Agency. All rights reserved. Disclaimer - Privacy
Website Design by Robazzo


