Lunch Box Mango Chutney Chickpea Salad

This plant-based lunchbox is full of flavours that both kids and adults will love. If you’ve got someone who is less than enthusiastic for eating pulses (i.e. beans, lentils, chickpeas) and/or leafy greens, give these recipes a try. They’re fantastic entryway recipes for people who think that they don’t like these nutritious foods.

It can be made both vegan and gluten-free. It’s also peanut-free and nut-free.

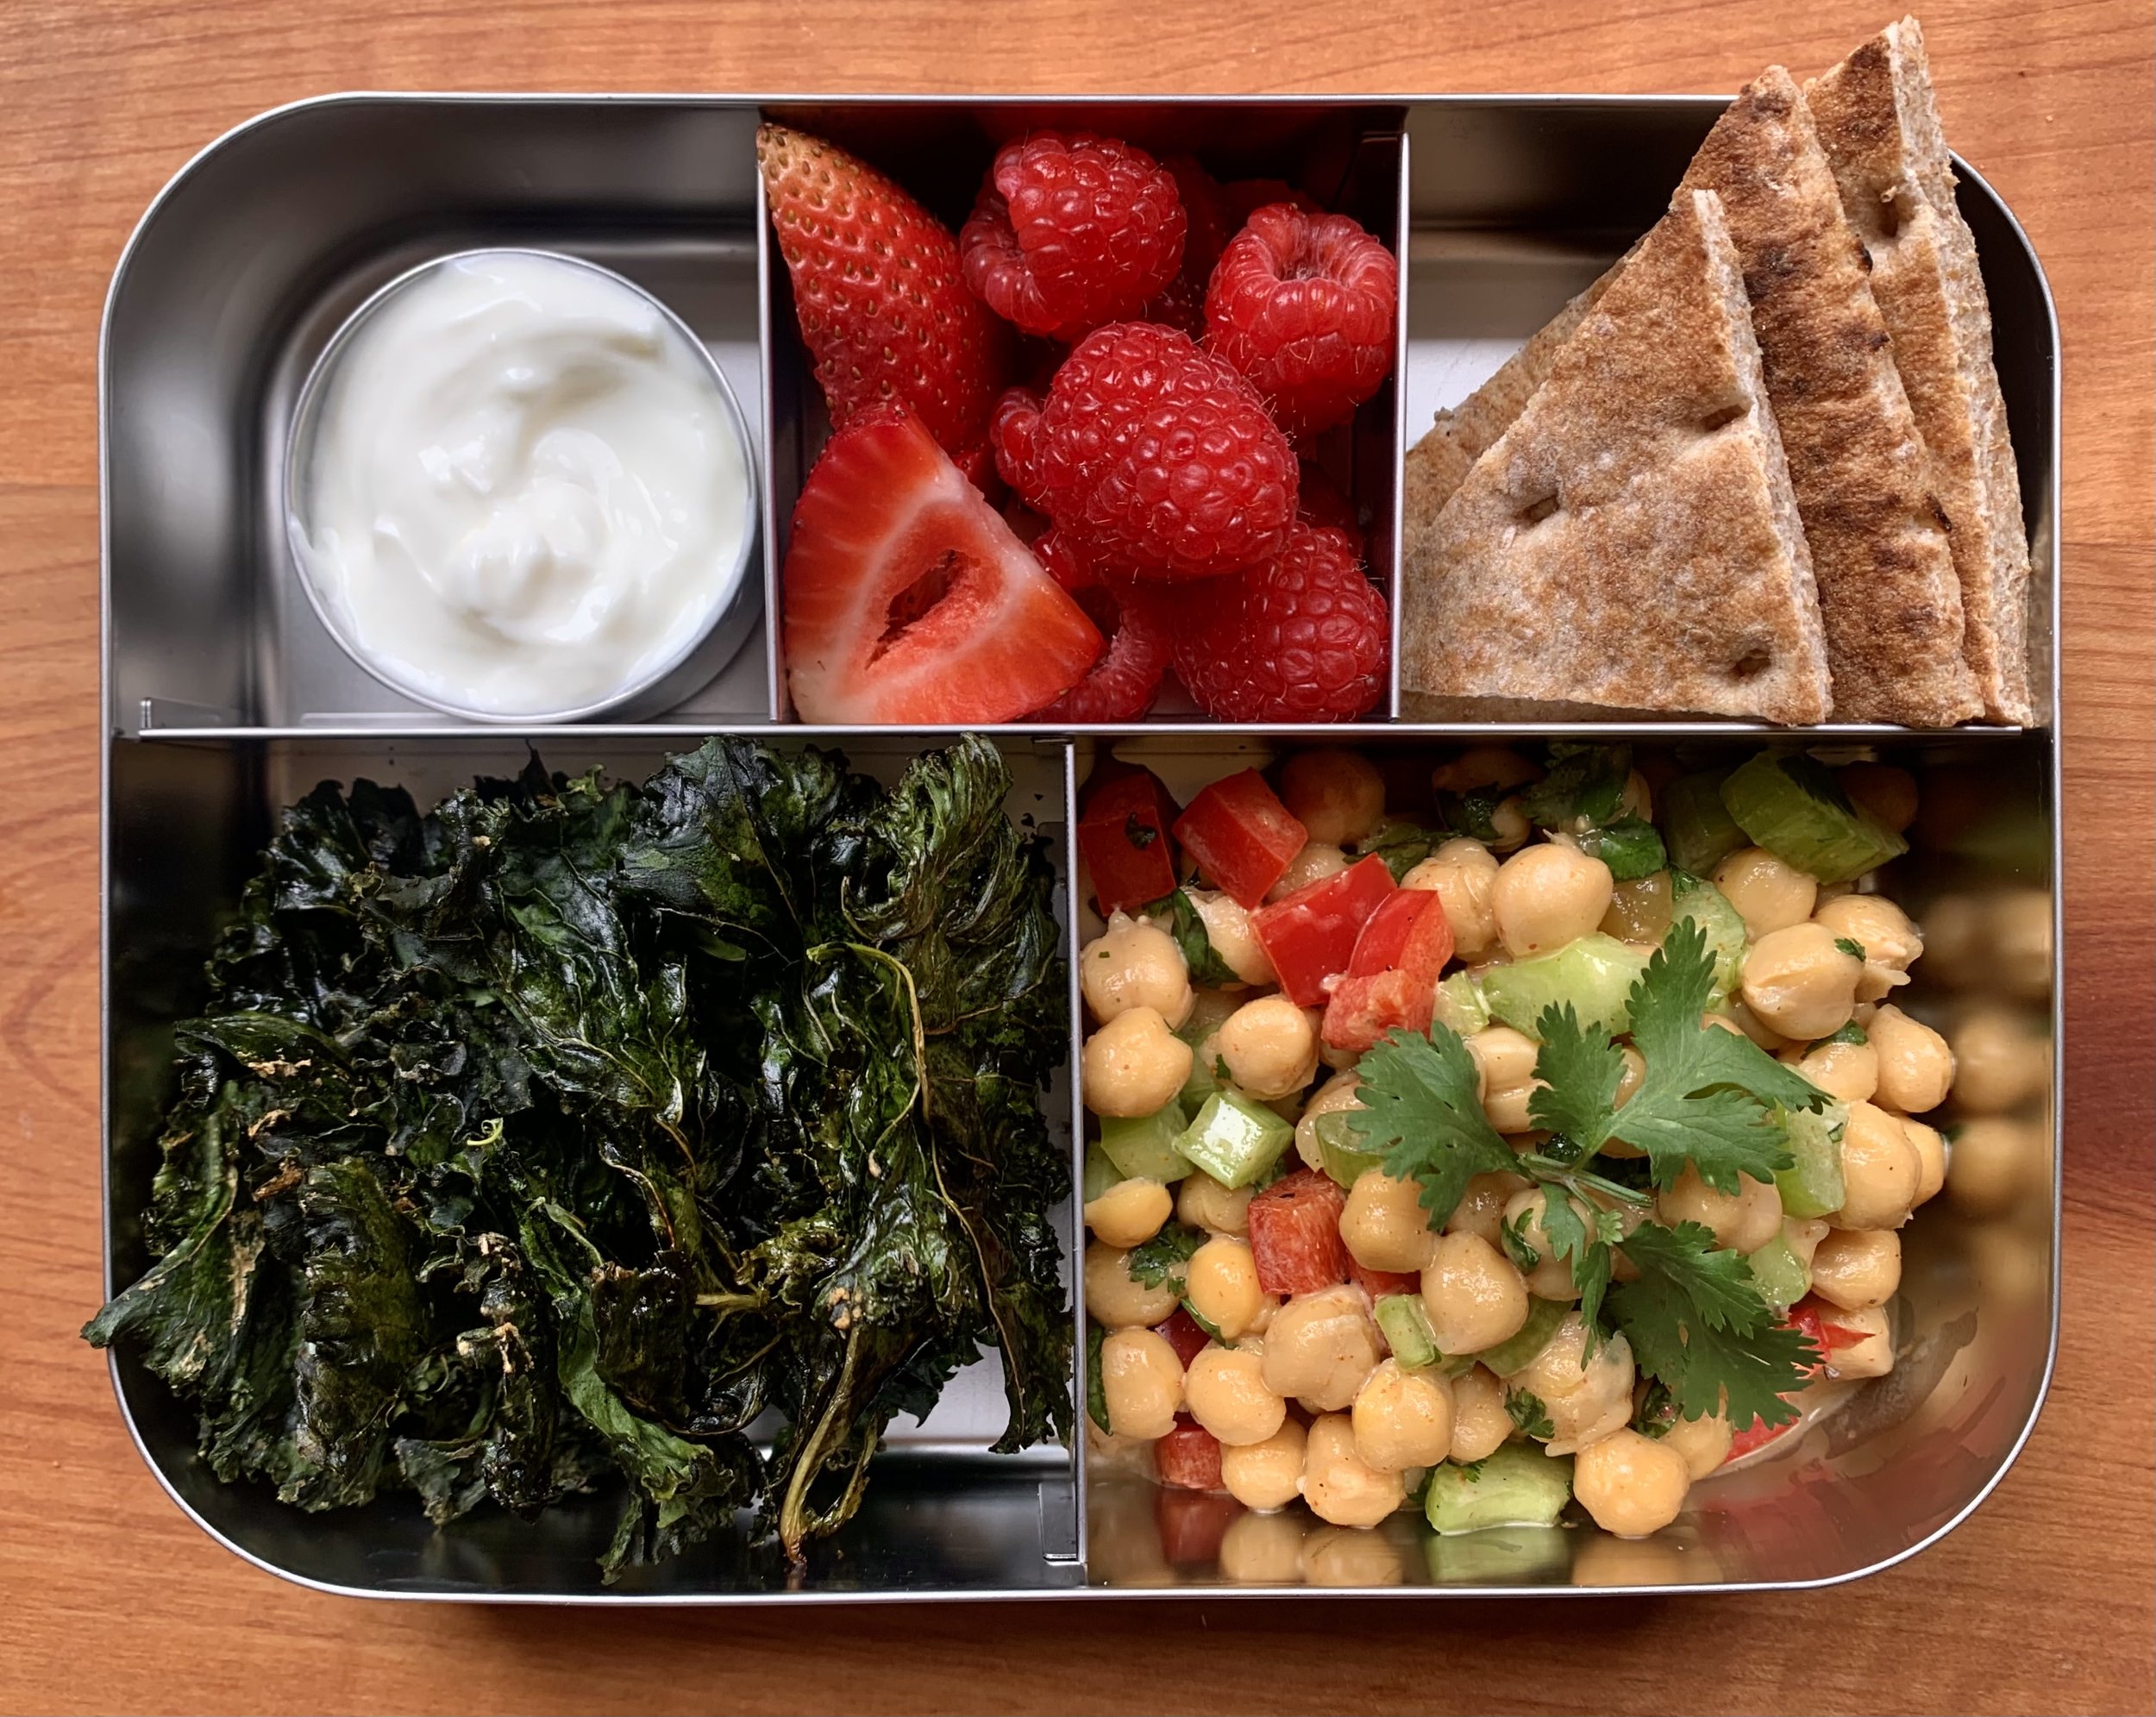
What’s in this lunch box:

  • Mango Chutney Chickpea Salad

  • Whole wheat naan (sub a gluten-free flatbread of your choice)

  • Baked Kale Chips

  • Mixed berries

  • Greek yogurt (for dipping the berries) Sub with a plant-based yogurt alternative for a vegan option.

Kids under 5 years: Mash the chickpeas before serving. Whole chickpeas can be a choking risk.

Enjoy!

Mango Chutney Chickpea Salad

A delicious alternative way to enjoy this recipe is to mash the chickpeas for a more chicken-salad or tuna-salad type experience. It also reduces the choking risk for kids under 5 years.

Mango Chutney Chickpea Salad Ingredients

¼ cup chopped celery

¼ cup chopped red bell pepper

¼ cup cilantro

1 can chickpeas (14-16 ounces)

2 tbsp mango chutney

1 tbsp mayonnaise/vegan mayo

1 tsp curry powder

Salt and pepper to taste

 Mango Chutney Chickpea Salad Directions

  1. Drain and rinse the chickpeas.

  2. Optional: In a large bowl: Mash the chickpeas.

  3. Combine all the ingredients in a large bowl. Stir to combine.

  4. Optional: Garnish with extra cilantro for presentation.

  5. Enjoy!

Baked Kale Chips Ingredients

1 bunch of kale

1 tbsp olive oil

1 tsp garlic powder

Salt and pepper to taste

Baked Kale Chips Directions

  1. Preheat oven to 325 degrees F.

  2. Wash kale and allow it to dry completely (we don’t want steamed kale).

  3. Massage the olive oil into the kale with your hands. Season with garlic powder, salt & pepper.

  4. Spread the kale out on a cookie sheet and bake for 20-25 mins (until crispy). Watch closely the last 18-25 minutes as the kale goes from crispy to burnt very quickly.

  5. Enjoy!

For another amazing Lunch Box recipe, check out: Black Bean Burrito with Pico De Gallo and Banana Chocolate Cookies

Photo and recipe credit: Olivia Dodsworth

5th Annual Homemade Ice Pop Recipes

spinach-kiwi ice pop

It's back, my annual home-made ice pop recipe collection. Some may call these homemade popsicles or paletas. Or, frozen smoothies. Whatever you call them they're a delicious summer treat. I want to give a big shout out to Carla, the dietetic student who is volunteering with me for creating these recipes. My directions for her: the recipes need to be simple, include no added sugar, include fruit and even veggies, and only include easy-to-find ingredients. Oh, and of course, that they needed to be delicious. She sure delivered.

The directions for each recipe are the same:

  1. Combine all ingredients in a blender.
  2. Blend until smooth.
  3. Pour into molds.
  4. Freeze.

Enjoy her work!

Kristen

P.S. For more delicious, healthy frozen recipes, check out these links:

Spinach Kiwi

Inspired by: http://www.kiipfit.com/spinach-kiwi-popsicles/

Packed with fruit and leafy greens, the vibrant green color of these popsicles comes from blending both kiwi and spinach.

  • 1/3 cup spinach
  • 1  kiwi
  • 2 drops lemon juice
  • 1/3 cup water

Mango Lassi

mango lassi ice pop

Inspired by: http://revisfoodography.com/2015/04/mango-lassi/

Inspired from a classic Indian cold drink, mango lassi is a blend of yogurt, fruit and spice. Not a fan of cardamom? Simply omit the spice and you can still enjoy it as a mango-yogurt blend.

  • 1 mango
  • 160 ml greek yogurt
  • 1 small pinch cardamom (to taste)

Cantaloupe

cantaloupe ice pop

This very simple and refreshing recipe allows you to use ripe or extra ripe cantaloupes. No added sugar necessary.

  • ¾ cup cantaloupe
  • ¼ cup water

Get more healthy home-made ice pop recipes here:

5th Annual Healthy Home-Made Popsicles (ice pops, paletas)

4th Annual Healthy Home-Made Popsicles (ice pops, paletas)

My Least Popular (But Very Effective) Picky Eater Tip

picky-eater-tip

I’ve been doing workshops for parents on picky eating for 8 years now. At every single picky eater seminar there is one strategy that always causes resistance with the parents in the audience. I continue to share it because it’s a very powerful strategy for minimizing picky eating. Yet I can almost hear the thud it makes when I describe it and it lands on the floor. The problem for which it’s a solution? How to get kids (particularly toddlers and preschoolers) to stay at the table for meals. It’s the solution for meals that go on and on forever because your child sits down, takes one bite, then pops up from the table to do something terribly important, then returns to the table, takes another bite, pops up from the table (and so on and so on).

So, what’s this successful, but unpopular strategy? Create a rule that all meals and snacks are eaten when sitting down. In other words: Stop. Eat. Then Continue On. Yes, I do mean snacks too. You may wonder why I continue to share this strategy knowing that it’ll be so unpopular. I share it because it really is successful for supporting kids to do a good job of eating. If we allow the common practice of letting kids eat snacks “on the run”, i.e. while in the car, in the stroller, you chasing them around the house spooning bite after bite into their mouths, we’re teaching kids that there is an alternative to sitting still at a table to eat. As seen through a toddler’s or preschooler’s eyes:

Why is it that sometimes can I eat while playing. But other times I’m told that I have to stop playing and sit at a table to eat (which is bo-ring).”

Create the expectation that all meals and snacks are eaten sitting down. In families who set this expectation, kids come to the table when called. They eat. Then, they continue on with their day (i.e. go back to playing). Meals and snack go much more smoothly and are less stressful because the kids aren’t constantly getting up from the table.

I understand the initial resistance that you may have to this strategy. In our super busy lives, how are we supposed to carve out time to stop and eat snacks? And it seems like I’m saying that you can never leave the house again, because you always need to be home to give snacks. Not true. Let me clarify.

Does this mean that you never get to leave the house again? No. In the summer this is especially easy. Stop at the park bench, picnic table, or spread out a blanket and enjoy a snack. Use similar ingenuity at indoor locations. For example, you can stop at the bench in the recreation centre foyer or use a table at the food court at the mall.

The important point is to stop. Don’t feed your child in the stroller, car seat, etc. And, don’t hand out a snack while your child continues playing. I know that it’s tempting to do so in our busy lives. But, it sets you up for more battles at meals and snacks. What seems like an efficient use of time in the immediate, actually costs you more time in the long run. In families who establish the stop-to-eat expectation, meals and snacks are very quick. And, they are much more pleasant. When it’s meal and snack time the kids simply get down to the business of eating.

Simply put: Stop. Eat. Then, continue on.

Get more successful picky eater tips. Sign-up for my e-newsletter today.

2 Easy Matcha Desserts

First, I want to let you know that I am not a baker. Second, I love sweets. So, you know that if I'm sharing a dessert recipe it’s going to be delicious and super easy. The two recipes that I’m sharing today certainly fit this bill. With very few ingredients and steps, they really couldn’t get any easier. They also are healthy choices. And, they’re green – perfect ideas for celebrating St. Patrick’s Day next week. If you’re looking for more green ideas, check out the two green smoothies that I shared for last year’s St. Patty’s Day. I was inspired by a local Matcha café that I’ve been visiting lately. I saw that they had “cooking grade” matcha and decided to give it a try. I added it to two (simple) dessert ideas that I enjoy all the time. And they were really successful. Voila - matcha desserts. Enjoy! P.S. You can find matcha powder in many specialty tea shops or grocery stores with good Japanese food sections.

Matcha Banana ‘Ice Cream’

Matcha banana ice cream

You’ve got to love a recipe with only 2 ingredients! Prepare 1 banana per person. The ½ teaspoon gives a definite matcha taste to the ice cream. If you have a picky eater, you may want to decrease it to 1/4 teaspoon so there’s basically no matcha taste, just some green colour.

Ingredients

  • 1 banana (frozen)
  • ½ teaspoon matcha powder

Directions

  1. Take the banana out of the freezer 20-30 minutes before you plan to prepare the ice cream.
  2. Break banana into several pieces and place in the blender.
  3. Add the matcha powder.
  4. Blend until smooth. I use the “ice crush” setting on my blender.
  5. Enjoy!

Matcha-Coconut Chia Pudding

matcha desserts - matcha chia pudding

Serves 4

Feel free to reduce the sugar to zero in this recipe. I enjoyed the balance at 1 teaspoon. Choose a regular fat (i.e. not low-fat), canned coconut milk to get the creamy texture and rounded flavour.

Ingredients

  • 1 teaspoon matcha powder
  • 1 teaspoon sugar
  • 3 TBSP chia seeds
  • 1 cup coconut milk

Directions

  1. In a medium bowl or Tupperware container, mix together matcha and sugar.
  2. Add the chia seeds and coconut milk.
  3. Stir to combine well.
  4. Let sit on the counter for about 10 minutes to allow mixture to start to gel.
  5. Refrigerate overnight.
  6. Enjoy!

Check out more recipes here.

Roasted Chickpeas - 4 Ways

It's official - 2016 is the year of the pulse! Pulses, such as chickpeas, are high in vegan-source protein, high in fibre, low-glyemic carbs, and contain lot of other nutrients. Did you know that we grow lots of them in Canada? Roasted chickpeas are a delicious way to eat more pulses. My friend Margie Barnard, a fantastic cook (we're talking Four Seasons Hotel), and I developed these recipes. We each had our favourites, so I’m sharing all four. The steps are the same for all of them.

Whole chickpeas are a choking hazard for little ones, so this is a good snack idea for kids 3 years and up (and us kids at heart).

Roasted Chickpeas Directions

  1. Drain and rinse the chickpeas.

  2. Pat dry the chickpeas until well dried (otherwise they’ll be mushy).

  3. Combine all the other ingredients in a medium-size bowl.

  4. Toss the chickpeas into the mixture. Coating the chickpeas well.

  5. Line a cookie sheet with parchment paper. Spread the coated chickpeas onto the parchment paper-lined sheet.

  6. We played around with the oven temperatures while they were cooking so I’m afraid that I don’t have exact temperatures and times for you. We started at 400 degrees for the first while, then stirred the chickpeas and reduced the oven temperature to 350 degrees. Keep a close eye on them while they bake. You’re looking for them to turn a golden brown colour. And, when you taste them, they have a crunchy shell and are soft in the middle. The recipes containing honey turned the darkest colour, the fastest.

  7. Allow to cool, then ENJOY!

Savoury Roasted Chickpeas

15oz can chickpeas

1/2 tsp garlic powder

1/2 tsp ground cumin

1/4 tsp salt

1/4 tsp pepper

2 Tbsp olive oil

Garam Masala Roasted Chickpeas

15oz can chickpeas

1 tsp garam masala

1/4 tsp salt

2 Tbsp olive oil

Honey Roasted Chickpeas

15oz can chickpeas

2 Tbsp honey

1 tsp sugar

1 tsp cinnamon

Sweet & Salty Roasted Chickpeas

15oz can chickpeas

2 Tbsp honey

1 tsp canola oil

1/4 tsp salt

See more healthy, delicious recipes.

Healthy Kids Snack - Banana Roll Ups

healthy kids snack banana roll ups

Sometimes the classics are a classic for a reason. Bananas and peanut butter simply taste great together. Here's a fun way to bring this classic duo together in a healthy kids snack. I'm choosing to share it today because it's easy for young hands to manage. Perfect if you're gearing up to pack snacks or a lunch for little ones with back-to-school next week. This works well with peanut butter, other nut butters (e.g. almond butter) and the non-nut butters if your child attends a nut-free facility.

Hey, it's also a delicious idea for those of us who are young at heart :)

Banana Roll-Ups Ingredients 2 small tortilla wraps, whole wheat ¾ medium banana 1 tbsp natural peanut butter, nut butter or non-nut butter ½ tsp honey (optional) 1 dash cinnamon, ground

Banana Roll-Ups Directions

  1. Slice banana.
  2. Spread nut butter or non-nut butter on wraps.
  3. Top with bananas.
  4. Drizzle honey and add a dash of cinnamon.
  5. Roll (pack in lunch boxes) and enjoy.

Get more healthy, simple, kid-friendly recipes.

Banana Ice Cream (Dairy and Sugar Free)

banana ice cream

I wish that I had discovered this recipe earlier in my life. It’s creamy, smooth and delicious – just like ice cream! Banana ice cream.

While it’s vegan and sugar-free, the best thing about this recipe (besides the taste) is that it only includes 1 or 2 ingredients. How great is that!

The secret is very ripe bananas. Buy them when you see them in the store. Slice and freeze them. Then you’re ready to make ice cream anytime you wish.

Blending the bananas does take a little while. At first they will break into a chunky slurry and you will likely think that this “ice cream” idea doesn’t work. Be patient. Next it will form one big ball. Then, suddenly, it will become a beautiful, smooth, whipped texture – just like ice cream. If you haven’t added any strongly coloured flavourings, the colour of your bananas will also suddenly lighten considerably to a creamy off-white. That’s what you’re looking for – your “ice cream” is ready!

There are likely hundreds of flavor combinations. I’m sharing the plain version (so you know the base recipe) along with 3 flavour ideas. My favourite is the cinnamon.

Banana Ice Cream Directions

  1. Peel and slice bananas. Freeze.
  2. Place frozen sliced bananas in a blender. Add flavouring ingredients. Blend until smooth.

Banana Ice Cream Ingredients

Plain

1 cup              sliced bananas

Cinnamon

1 cup              sliced bananas

¼ tsp              cinnamon

Chocolate

1 cup              sliced bananas

½ - 1 tsp        cocoa

Half a teaspoon of cocoa results in a banana ice cream with just a hint of chocolate. One teaspoon gives a full chocolate flavour. Choose a level that you enjoy.

Strawberry

2/3 cup          sliced bananas

1/3 cup          strawberries

This combination works best if you partially blend the bananas first until they are just about to start creaming. Then add the strawberries. The result will be a creamy ice cream with strawberry flavour. Adding the strawberries at the same time as the bananas results in a more icy rather than creamy texture (more sorbet-like rather than ice cream-like).

Check out more healthy recipes.

Fresh Fruit Granitas

Fresh Fruit Granitas

Similar to a slushie but made with real fruit, granitas are super refreshing in the summer heat.

They’re easy to prepare. The only tricky thing is to plan ahead so that you’re home and you remember to break up the ice crystals every hour (I set the alarm on my phone to remind me).

Kids can help measure ingredients, push the buttons on the blender, and scrape the ice crystals.

The fruit flavor is strong in granitas. The recipes here are listed from the most mild to the strongest. If your little ones prefer mild flavours, stick to the melon granitas. The kiwi granita is so strong that it almost made my eyes water (which I enjoyed on a hot afternoon).

Fresh Fruit Granitas - Directions

The steps are the same for all the recipes:

  1. In a saucepan, combine sugar and water.
  2. Bring sugar water to a boil until the sugar is well dissolved.
  3. Remove from the heat and let cool for 10 minutes.
  4. In a blender, combine the fruit (removed from it’s peel and pits), fruit juice (or other liquid), and sugar water.
  5. Pour into a non-metal baking dish, such as a glass lasagna pan.
  6. Place in the freezer. Freeze for 1 hour.
  7. Remove from the freezer and scrape thoroughly with a fork, breaking up the ice crystals.
  8. Return to the freezer for 1 hour. Again, remove from the freezer and break up the ice crystals with a fork. Repeat at least 2 more times.

Fresh Fruit Granitas - Recipes

Cantaloupe

Adapted from: http://www.whiskaffair.com/2013/03/cantaloupe-lemon-and-mint-granita.html

1                      cantaloupe

1/4 cup          sugar

¼ cup             water

4 TBSP            fresh lemon juice

Raspberry-Watermelon

Adapted from: http://whipperberry.com/2013/06/raspberry-watermelon-granita.html

5 cups             cubed, de-seeded watermelon

2.5 cups          raspberries

½ cup             sugar

½ cup             cran-raspberry juice cocktail

(Combine sugar and cran-raspberry juice cocktail in saucepan.)

Pineapple-Mango

Adapted from: http://www.muybuenocookbook.com/2013/03/pineapple-and-mango-granita-blendtec-giveaway/

Juice from 2 limes

1/3 cup          sugar

1                      pineapple, peeled, cored and diced

2                      mangos, peeled, pitted, and diced

(There’s no heating the sugar in this recipe. Simply combine all ingredients in a blender.)

Kiwi

Adapted from: http://dhaleb.com/2010/03/

5                    kiwis

½ cup           sugar

½ cup           water

1 cup              club soda

2 teaspoons   lime juice

See more delicious, healthy recipes here.

How to Help Kids Stop Dawdling at Meals

How to Help Kids Stop Dawdling at Meals

Most parents ask me for help with getting their kids to actually stay sitting at the table (if that’s you, check out this blog post). But every once and a while parents ask me for help with the opposite problem. Their child takes forever to eat. Every meal is a long, drawn out affair with long minutes going by between each bite. Every time you go to take their plate away they take another bite or two. You feel torn amongst letting them get enough to eat and actually moving along with the day. If this sounds like you, here’s a strategy to help your child eat enough during a reasonable mealtime.  

Step #1: Check Your Expectations. For us adults, the mechanisms of eating are easy. We move the muscles in our mouths and throats to eat without even thinking of it. And, we have the dexterity to use utensils with ease.

Toddlers still are learning the mouth control for eating. So it can take longer to chew and swallow safely. That’s exactly why we have the recommendations of not giving choking hazards to kids under 3 years old.

Preschoolers and school-age kids have mastered chewing and swallowing. But they are still mastering utensils. Expect them to take longer to eat when a meal involves utensils.

Step #2: Use a Visual Clock. Have you taken into account the extra time for mouth coordination and utensil use and determined that you have an honest to goodness dawdler? Here’s a technique that I’ve used with lots of kids to help them learn to manage their mealtime. It’s quite simple really. Kids this age do well with visual cues. This technique stops you from nagging that it’s time to finish up (and prevents kids from learning to tune you out). You simply set a timer, let kids see it counting down, and kids learn to manage completing their task (in this case, eating) within the allotted time. Older kids can follow a simple timer countdown on a cell phone or tablet set up on the table. Younger kids need a visual that doesn’t involve numbers. There are a number of apps and devices available to create a visual representation of a clock. An example of a product is: http://www.timetimer.com/store

To look for apps simply search for “visual timer” in your device’s app store (iTunes, Google Play).

To use the visual clock, introduce the new rule to your child then follow-through. Expect them to get it wrong a few times as they experience the learning curve. During this transition, don’t let them continue eating after the timer is done. Because they will likely be a bit hungry, do plan an extra big snack and, if you can, move snack time up a bit.

Kids are smart. They learn how to regulate their meal time within a few days.

Sign up for my e-newsletter for more tips on feeding kids.

4th Annual Home-made Popsicles (a.k.a. Ice Pops, Paletas)

Home-made popsicles, healthy, no sugar

I love that the healthy home-made popsicles trend is continuing (also known as ice-pops or paletas). Have you jumped on board? It's a fantastic way to enjoy some fruits and veggies. All these recipes are delicious. You won't believe that they have no sugar. Kids often love to help make them too. Here are 4 new home-made ice pop recipes for you to enjoy this summer. In case you're wondering why there are 4 recipes but only 3 in the picture, I ate all the banana-strawberry-orange ones before taking the photo :)

Home-Made Popsicles Directions

All the steps are the same for all home-made popsicles. And they're very easy:

  1. Combine ingredients in a blender.
  2. Blend until smooth.
  3. Pour into the ice-pop molds.
  4. Freeze.
  5. ENJOY!

Home-Made Popsicles Ingredients

Healthy Creamsicle

This simple 3 ingredient recipe is inspired by one of my childhood favourites – creamsicles. But unlike creamsicles, the only sugar in this recipe is that naturally found in orange juice.

  • 1 cup coconut milk
  • 1 cup orange juice
  • ½ teaspoon vanilla extract

Banana-Strawberry-Orange

Use ripe bananas and in-season, local strawberries and these are naturally sweet – no added sugar is needed.

  • 1 medium banana
  • 10 strawberries
  • ½ cup orange juice

Watermelon-Cucumber-Spinach

Don’t let the deep green colour of this recipe discourage you. It’s my favourite of the 4 recipes here – super refreshing and subtly sweet.

  • 2 cups watermelon, cubed
  • 6 large spinach leaves, thick stems removed
  • 2 inches cucumber, peeled and seeds removed
  • ½ cup coconut water

Pink Grapefruit

This recipe doesn’t need to be blended. Simply juice the grapefruits and combine with the soda water in a pitcher. Pour into the molds and freeze. If you find pink grapefruits too sour, you can substitute freshly squeezed orange juice.

  • 1 cup freshly squeezed pink grapefruits (approx 3 grapefruits)
  • 1 cup soda water

See more healthy, delicious recipes for home-made ice pops.

Don’t Be Heavy-Handed with “Nutrition” Talk - Teaching Nutrition to Kids

Teaching Nutrition to Kids

I had the best time on Friday! I was invited to the Valentine’s Day party at the local elementary school. I brought a variety of fruits and veggies and led an activity where we used cookie cutters to cut out hearts and thread them onto wooden skewers to make cupid’s arrows (thank you Pinterest). Do I have the best job or what?! But was I just playing? No. There’s a method to my madness. I’ve learned something in the (gulp) 20 years that nutrition’s been my world. It’s that teaching nutrition to kids isn’t the way to inspire people to have healthy eating habits. Sure, talking about vitamins, minerals, etc will change what some people eat. There will be the exception that proves the rule. But it truly is the exception. I learned this lesson the hard way. When I was a bubbly, enthusiastic nutrition student, I shared my new-found knowledge with anyone and everyone (whether they asked for my 2 cents worth or not). Guess what? Not surprisingly, most people rolled their eyes at me and went on with their same (unhealthy eating) behavior.

I’ve learned that the most effective way to influence people’s behaviour is to simply serve them delicious, healthy food. And don’t say anything about it.

With kids there is even more opportunity! You see they haven’t had 10, 20, 30 years-of habits that we need to break. With kids, all we need to do is to include healthy foods in fun and everyday activities. To make healthy eating the norm. That’s why I worked to get myself invited to the Valentine’s Day party. Because, it was a fantastic way to infuse a celebration day with healthy food. The kids totally got into it and had a fantastic time. In fact, we hardly had enough fruit to thread on the skewers because they were eating so much of it. I can honestly tell you that they didn’t miss baking cookies one bit.

Creating a positive association with healthy eating is more powerful than knowing that I “should” eat something because it has vitamin so-and-so in it.

Recently a study confirmed my experience. They found that kids were less likely to try a food. And, they rated a food as tasting worse, if they were told that it was healthy.

It’s so tempting to go on and on about WHY kids should eat a healthy food. But do your best to resist the temptation. It’s more effective if you aren’t heavy-handed with the “nutrition” talk.

As the saying goes:

“Actions speak louder than words”.

How do you incorporate healthy eating into fun activities? I'd love you to share in the comments below!

Get my e-newsletter for successful tips to teach kids healthy eating.

Can Kids Have Too Much Fruit?

baby w fruits & veg

Here’s what a Mom recently asked me: "I have what may be a silly question. Should I be concerned with my 8 month old getting too much fruit? In other words, can kids have too much fruit?

Can Kids Have Too Much Fruit?

In a word: yes. Let me expand with 2 key points.

  1. All of us (i.e. adults too) can get diarrhea from eating too much fruit at once. If your child’s stools are getting loose, then it's a sign of too much fruit.
  2. Of course, fruit is a healthy food. But human beings need a wide variety of foods from all the food groups to meet our nutrition needs.

In particular, for babies, toddlers and preschoolers, iron is a key nutrient that we’re looking to provide through food. Fruit is low in iron. It’s recommended that you offer iron-rich foods twice a day.

It’s normal for kids to have food preferences. However, kids aren’t at a developmentally ready to understand that human beings can’t survive on a favourite food alone until they’re well into their school-age years.

How to Make Sure Your Child Doesn't Get Too Much Fruit

If you notice that your child will always choose one or two favourite foods, I recommend starting a technique that I call “controlling what’s on the menu”.

Here’s how. You choose what foods you will offer, i.e. what foods are on the menu, at meals and snacks. Your child gets to choose what they’ll eat from what you’ve provided. And, they get to control how much of each food they eat (yes, including zero bites).

This way you are creating a situation where your child eats a balance of food groups throughout the day. And, your child gets to express themselves by controlling what they eat from what you’ve provided. You’ve created an environment where you’re making sure that your child is getting good nutrition at the same time as your child’s personal boundary with their body is respected.

For example, for this mom’s 8 month old, at one solid food time each day serve an iron-rich food either on it’s own, or with another food that isn’t fruit – maybe it’s a vegetable or a grain. Feel free to offer fruit at the other solid food time where you’re offering the iron-rich food. If your child eats a particularly huge amount of fruit one day and you notice that his stools are loose, hold off offering fruit for a day or two. Create balance by offering vegetables, protein foods, and grains.

Get child nutrition tips delivered directly to your inbox. Sign-up for my e-newsletter.

It’s Less Work than You Think (Healthy Snacks)

healthy snacks

When I’m introducing my concept of 5-6 equal opportunities to eat to Moms and Dads many think that it sounds impossible – it’s too much work. But I promise you it’s not. In fact, it’s likely the same amount of work that you’re currently doing. But it’s work that’s moving you in the right direction of getting your picky eater to try new foods (instead of inadvertently fuelling pickier eating).

But I think I’m getting ahead of myself here. First let me explain what I mean by 5-6 equal opportunities to eat.

Toddlers and preschoolers have little tummies, short attention spans, and big nutrition needs. That’s why they need more than just 3 meals a day. I’ve found that most kids so best with three meals plus two or three snacks per day.

When I say the word “meal”, you likely imagine something with healthy foods from multiple food groups, perhaps eaten while sitting at a table. In contrast, when I say the word “snack” you likely think of something small to eat, perhaps less healthy foods, grabbed and eaten on the run.

Most toddlers and preschoolers don’t have appetites that are bigger at “meal” times and smaller at “snack” times. Instead of differentiating between “meals” and “snacks”, I recommend treating these as all as “opportunities to eat”.

So, instead of giving your child 3 meals plus 2 – 3 snacks per day, I recommend re-framing the concept to offering 5 – 6 opportunities to eat each day.

But the phrase that I started with in this post had the word “equal” in it: “5 – 6 equal opportunities to eat” .

Here’s where the “equal” comes into play.

To best meet kids’ nutrition needs in the face of their short attention spans, I recommend taking each of the 5 – 6 opportunities to eat to provide kids with healthy foods. This way if they eat a lot at afternoon snack and only two bites at dinner, it’s less of a worry than if you gave your child junky foods at afternoon snack and were relying on dinner for those vegetables, fruit, and whole grains.

Consider each opportunity to eat an equal opportunity to provide healthy foods from 2 – 4 food groups. Yes, this may mean that you’re putting more thought and effort onto your child’s snacks.

However, I can’t tell you how many families I’ve worked with who are providing quick snack handouts all day long. These parents are feeding their kids almost every hour of the day. That’s a lot of work!!

Instead of putting all your time and effort into providing constant snacks, I recommend offering 5 – 6 equal opportunities to eat each day, each of which has 2 – 4 food groups.

It’s less work than you think. And, you will be more successful in helping your child get the nutrition they need and have less picky eating behaviour.

Have you been using the 5 – 6 equal opportunities to eat strategy? Have you found it to be more work? I’d love you to share your experience in the comment section below!

Get more successful picky eater tips delivered directly to your inbox when you sign up for my e-newsletter.

Use After School Snacks to Get Picky Eaters to Try New Foods

picky boy eating new foods after school snacks

{Guest Expert Contribution to Kidzedge} If you’re like the parents of picky eaters I’ve helped for the last 6 years, you’re constantly on the look out for ways to get your kids to eat more (healthy) foods. After school snacks are a great (and often overlooked) opportunity to contribute to kids’ nutrition. Here’s why after school snacks are such a great time to get kids to eat more foods, how to do it, and some snack ideas.

After School Snacks Why it Works:

Have you ever tried getting a child to eat a new food when they aren’t hungry? It’s a lesson in futility. Many kids have big appetites at after school snack time. Appetite is a great motivator for kids to try new foods. Take advantage of this natural window of opportunity and use after school snacks to offer your child new foods.

After School Snacks Steps to Take:

Step #1: Plan snacks that include foods from 2 or more food groups. Often we think of snacks as a time for junk food. Or, as a time for a single food – e.g. an apple. But kids have big nutrient needs and small tummies. They need healthy foods more than just at 3 meals per day.

Step #2: Consider meals and snacks to be equal opportunities to eat. A mistake that many parents make is to give their child healthy foods at meals and favorite foods at snacks. This stacks the odds against kids eating well at meals. Instead, frequently, give your child a snack that includes either a new food or a food that your child has seen many times but hasn’t tried yet.

Step #3: Think outside the snack aisle. When looking for snack ideas, it seems natural to look in the snack aisle of the grocery store. But this aisle is mostly filled with highly processed, junk foods. Instead, look for easy to eat versions of meal foods. Focus on providing foods from the food groups where your child isn’t meeting the recommendations. To see the recommendations, check out My Plate or Canada’s Food Guide

After School Snack Ideas:

  • Edamame and an orange (2 food groups)
  • White Bean Dip* with a variety of raw veggies such as snow peas, carrots, and zucchini (2 food groups)
  • Hard-boiled egg and toast (2 food groups)
  • Yogurt with blueberries and hemp hearts (3 food groups)
  • Sliced banana on top of whole grain crackers/rice cakes/corn cakes spread with peanut butter, nut-butter, or non-nut butter. (3 food groups)

White Bean Dip Recipe

Makes 12 Servings

1 can (14 oz, 17.6 oz) cannellini beans, canned, drained 1 bulb garlic, raw 1/4 cup (2 oz) olive oil 1/4 cup (2 fl oz) lemon juice, fresh

Directions:

  1. Preheat the oven to 400 degrees F.
  2. Remove the outermost skin of the garlic bulb (the loose stuff). Cut off the very top of the bulb so the tip of each clove is exposed. Rub the entire bulb with some olive oil. Wrap in tin foil, shiny-side inwards. Place on a cookie sheet or in a casserole dish.
  3. Roast in the oven for approximately 45 minutes, or until the bulb gives off the distinct roasted garlic (not raw garlic) aroma and the cloves are squishy.
  4. Allow to cool.
  5. Drain and rinse the beans (rinsing removes some of the “magical” part of the beans). Place them in a medium-size bowl.
  6. To the beans, add half the olive oil, half the lemon juice, and half of the cloves of garlic. Using a hand-held blender, blend the mixture until it’s smooth. Adding more olive oil, lemon juice and garlic to taste and to get the texture to the desired smoothness.
  7. ENJOY with tortilla chips, crackers, apple slices, and raw veggies like carrots, celery and bell pepper strips.

Note: You can roast the garlic days in advance.

Check out my recipe page for more healthy after school snack ideas for kids.

Healthy Home-Made Ice-Pops for Kids

Healthy Home-Made Ice-Pops

Recently my friends and I were having a nostalgic laugh about the rising trend of home-made ice pops – also known as paletas. The dietitian in me loves that parents are choosing to make tasty snacks for their kids that beat the heat that include real fruits (even veggies) instead of frozen, colored, sugar water. What made my friends and I giggle was remembering how we too had homemade ice pops when we were kids. However, we were raised in the suburbs in the early 80’s. Our ice pops consisted of frozen OJ concentrate, re-constituted with water, and then frozen again in the ice-pop molds. Not exactly gourmet!

Now pint-sized foodies are enjoying paletas (even the new name is fancy) made with on-trend, healthy ingredients like coconut, avocado, Greek yogurt, almond milk, even kale. And, while we were absorbing all sorts of plastic by-products, you can now buy BPA-free plastic molds and stainless steel molds. It’s amazing how far we’ve come!

Interested in making some yourself? A Google or Pinterest browse will supply you with a summer full of healthy frozen kids snack ideas. Here are two ideas to get you started. For the recipes, all the steps are the same:

  1. Combine ingredients in a blender.
  2. Blend until smooth.
  3. Pour into the paleta molds.
  4. Freeze.
  5. ENJOY!

Blueberry-Kale Home-Made Ice Pops

You really need to blend this recipe well, otherwise the kale pieces are quite big which I found unpleasant (and I love kale). The kale is never truly hidden in these, but when well-blended, it’s an enjoyable part of their texture.

1 cup frozen blueberries 1 cup kale leaves, stems removed (ideally baby kale leaves) 2 cups coconut water

Raspberry-Almond-Coconut Home-Made Ice Pops

A luscious, dairy-free recipe!

1.5 cups almond milk 1/2 cup coconut milk 1 cup fresh or frozen raspberries 2 teaspoons honey pinch of salt

Combine your favorite fruits with other healthy ingredients for a delicious and refreshing summertime paleta treat!

Get more home-made ice pop recipes here.

Food Rewards - How to Get Your Child to Behave Without Them

Food Rewards

I was happy to meet Julie recently. She's a child behaviour and discipline specialist. As soon as I met her I knew that she would be the perfect person to answer a question that parents often ask me. You see, I teach (based on the research) that it's not good to use food as a bribe or reward for kids behaviour. So parents would ask me for alternatives. And that's where I hit the end of my expertise - I'm a child-feeding expert - not a child behaviour expert. Read on to see what Julie recommends as alternatives to food for teaching kids to have good behaviour.

Enjoy! Kristen

  • Chocolate to stop crying.
  • Dessert if you finish all of your dinner.
  • Candy to buy a few extra minutes of peace & quiet.

Why Food Rewards Are A Bad Idea

Parents give food rewards to their children because it works……for the short term, plain and simple. However, the long term effects on the child may include poor appetite management, low self-esteem and distorted food control because they have now associated food with negative behaviour and/or pain. This learned behaviour could possibly leave your child with a potential food addiction which can carry right on through the teen years and well into adulthood.

There are many other ways to encourage your children to do what you expect of them without bribes, threats or rewards. Add more options to your Parenting toolbox so you are not left with food rewards as your only option.

5 of our BEST BEHAVIOUR Techniques (Without Food Rewards)

  1. Expectations & Routines – create routines throughout the day with your expectations in them
  2. Visuals – create a chart, poster or picture for each routine & reference them throughout the day
  3. Choices – offer your child at least 2 things to choose from instead of just demanding something
  4. Follow through – what you say…..you do!
  5. Consistency - say & do the same thing each and every time the same behaviour shows up

Try all 5 together for the BEST RESULTS!

Find out more on this topic and many others at www.missbehaviour.ca.

Learn about Julie Romanowski, Mom, Early Childhood Consultant & owner of

Miss Behaviour: parenting coach & consultant service.

FACEBOOK

PINTEREST

TWITTER

PARENTING BLOG

PARENTING TIPS

"CHILDREN'S BEHAVIOUR & DISCIPLINE SPECIALISTS!" behaviour - discipline - tantrums - communication - interactions - daily routines – solutions

More Super Smoothies (for Picky Eater Kids)!

smoothies picky eater kids It happened again yesterday. I was leading a workshop and a parent asked me: “Is it wrong to give my child smoothies with veggies in them? Is this considered hiding veggies?” Rarely a workshop goes by without a parent asking me about smoothies for their picky eater kids. They’re such a popular trend these days. While I touched on this in last week’s blog post; it’s such a common question that I get about healthy snacks for kids that I thought that it was worthwhile to expand on it today. And, share some ideas for smoothie ingredients.

I think that smoothies are a great way to provide vegetables, fruit, protein, and healthy fats for kids. BUT there are a couple of key points to follow to be using them to role model healthy eating and support your child to try new foods on their own:

  1. Don’t lie about the ingredients. This is when you start veering into the “hiding” territory. If you’re waking up at 2am to puree foods so that your child doesn’t know that they’re in a smoothie, then you’ve strayed in the wrong direction. This doesn’t mean that you have to read out to your child a list every last ingredient in a smoothie. But don’t deny a food’s existence. Having your child help make the smoothie (like I suggested last week) is a great way for them to know what’s in it.
  2. Continue to serve “obvious” vegetables (and eat them yourself). Yes, even if your child doesn’t eat them, you’re role modeling choosing to eat vegetables. You’re teaching an important life lesson that I promise is sinking in (even if the vegetables aren’t getting eaten currently).

As I mentioned above, smoothies are a great way to provide vegetables, fruit, protein and healthy fats in a way that many picky eaters will actually eat. Here are some ingredient ideas. Note that some of the ingredients (e.g. nuts) require a higher-powered blender. Mix and match the ingredients to find combinations that you love. And don’t’ be afraid to experiment to find new favs. My new favourite is pistachio-mint-banana, which I was introduced to while on vacation in California last month!

Smoothie Ingredients - Vegetables:

  • Spinach
  • Kale
  • Avocado (also helps a smoothie be creamy)
  • Carrot (I find carrot that’s already grated to blend better than larger pieces)

Smoothie Ingredients - Fruit (choose fresh or frozen fruit instead of juice):

  • Banana (also helps a smoothie be creamy)
  • Berries of any kind
  • Peaches
  • Mango
  • Pineapple
  • Orange
  • Kiwi

Smoothie Ingredients - Protein:

  • Yogurt
  • Cashews (or cashew butter)
  • Ground almonds (or almond butter)
  • Peanut butter
  • Pistachios
  • Pumpkin seeds (or pumpkin seed butter)
  • Hemp hearts

Smoothie Ingredients - Healthy Fats:

  • See all the nut and seed ideas above (including hemp hearts)
  • Avocado
  • Flax oil (or ground flax seeds)
  • Hemp oil
  • Fish oil
  • Vitamin D drops

Other tasty ingredients (that pack more of a taste punch than a nutritional punch):

  • Dates
  • Mint
  • Cocoa powder

Looking for more ideas? Check out the recipe for my Sunshine Smoothie (Orange-Pineapple-Fresh Turmeric) or these green smoothies.

A Super Way to Introduce Kids to the Kitchen: Smoothies

smoothies You’ve probably heard that it’s great to get your kids to help you in the kitchen to learn cooking skills, instill healthy eating habits, and more.


When I’m talking with moms and dads they often tell me one of two things about this:

  1. It sounds like a great idea. But they just can’t imagine how to make it happen when they think about the amount of work and the mess.
  2. Yes, they bake with their kids sometimes.


This is another great example of us health folks meaning one thing and parents hearing another.


Now don’t get defensive or let your mommy guilt kick in. I’m taking ownership of the miscommunication happening here.


When I mean “cook with your kids” I mean “get your kids involved in making healthy foods”.


I’m not against baking with kids. It’s fun too. Just don’t limit yourself to baking.


Invite your kids into the kitchen to help with simple, everyday tasks.


Choose one simple task for them to help with. Examples include:

  • Washing veggies
  • Measure out the dry quinoa/ rice and water
  • Spinning and tearing up the lettuce for a salad
  • Setting the table
  • Placing dirty dishes in the dishwasher
  • Smoothies


Smoothies are also a fantastic way to get kids in the kitchen:

  •  They’re something that they can make from start to finish.
  • They’re quick and relatively mess-free.
  • They include healthy ingredients.
  • I’ve never met a child who doesn’t LOVE to push the buttons on machines (from cell phones to elevators to blenders).

And, while sometimes parents confess to me that they “hide” foods in smoothies (e.g. kale, spinach), it’s not “hiding” when your kids are the ones putting the ingredients in the blender! They’re simply helping make a tasty dish that includes healthy ingredients!

Do you involve your kids in making smoothies? What are your favourite smoothie combinations? I'd love to hear from you (comment below)!

Can I give finger foods if my baby doesn’t have teeth yet?

finger-foods-if-baby-doesnt-have-teeth-yet {Guest Post at Love Child Organics Both in workshops and when providing in-home child feeding sessions, I’m often asked this question: "Can I give finger foods if my baby doesn’t have teeth yet?

The short answer is: yes! You don’t need to wait until little ones have teeth before feeding them finger foods.

Babies are ready for finger foods by 7 months, if not before. Many won’t have teeth (or very many teeth) by this age.

Your baby is likely ready for finger foods when you see the following:

  • She can bring food to her mouth using her hand.
  • He can eat thicker purees (the consistency of mashed potatoes).
  • She can sit upright with minimal support.
  • He is very interested in watching people eat and the food on your plate. He May even be grabbing for people’s food, plates, cups etc.

It’s amazing to watch what little ones can handle with their gums. So go ahead and offer finger food versions of a wide variety of foods that your family eats.

Bottom Line: Enjoy watching your little one discover the amazing variety of tastes and textures that food comes in!

For more info on baby food - both purees and Baby-Led Weaning (BLW), check out this blog post.

Beets: What to Do with Them

beet-recipes-dietitian-dietician-victoria-bc Aah, beets. These versatile root veggies are one of my favourites! As a dietitian, part of my job is to know how to prepare healthy foods like beets. So I’m sharing a couple of my favourite ways to use them. A classic storage, root veggie, you can find local ones (fairly cheap) throughout the winter here in Victoria, BC.

And, because of their naturally sweet taste, many kids like them.

However, people often wonder what the heck to do with them. Here are some of my favourite ways to use them.


Grated – Raw Beets

Beets don’t even need to be cooked. Simply wash them, peel off the outer skin, and grate them into a salad.

It doesn’t get any easier than that!

Grated veggies are a fantastic finger food for little ones to practice that pincer grasp.

However, be warned – beets stain! Pick up pieces from all surfaces (including the floor) quickly.

Grated, raw beets are a delicious part of my lentil-farro power bowl (full meal salad).


Roasted Beets

When I’m turning on the oven to cook something, I often pop a few beets in at the same time – either for a warm side-dish today, or for chilled as a salad in the future.

  1. Wash beets and cut off any long tails or furry top bits.
  2. Cut a piece of tin foil large enough to wrap the beet in. Lay it on the counter, shiny side up. Pour a dollop of olive oil in the centre.
  3. Roll the beet around in the oil to coat it. Wrap the tin foil tightly around the beet.
  4. Repeat for each beet.
  5. Place wrapped beets on a cookie tray or in a baking dish.
  6. Roast until tender, how long this takes depends on the size of the beets and the heat of your oven – at 350 degrees F it may take as long as 2 hours; at 425 degrees F it may take as short as 45 min.


Beet and Bean Borscht

Check out this fantastic hearty and tasty full meal in one pot, vegetarian borscht here. While the recipe takes a little longer to cook, it makes a lot of soup. And, this soup tastes great re-heated. Freeze leftovers (without the yogurt or sour cream topping) in small batches. I wanted to share it not only because it’s so tasty, but because it’s handy to have healthy meals like this in the freezer when the busy holiday season starts up.

Beans, beets and cabbage are all super healthy (and inexpensive) that I’m always looking for new recipes. I picked up this little pamphlet at the Saskatchewan pavilion at the 2010 Olympics. Did you know that we grow tons of beans, split peas and lentils here in Canada?

If the mixed textures in this soup are too advanced for your little one, simply take beans and pieces of the veggies out of the soup and place them in your little one’s dish/ on their tray.